Select a Course
Course Filter Tab
The Course Filter tab allows you to select the course you wish to see enrollment data for. If you need to view a course that is contained within a curricula, make sure you select the Show Curricula option at the top of the Course Filter tab.
There are several filters that can be used to assist in easily finding the correct course.
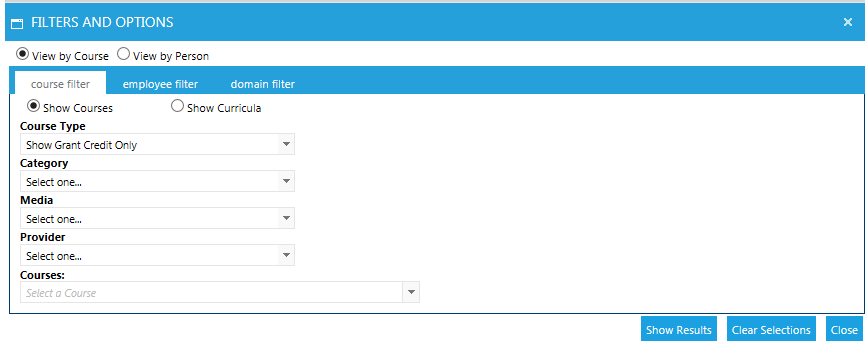
- Course Type (Required)
- The course types (with the exception of the Grant Credit Only) represent the status a resource could be, such as Active or Retired. Grant Credit Only limits the results to credit-bearing courses.
- Category (Optional)
- This lists the categories that are available in your system.
- Media (Optional)
- This lists the media types that are available in your system.
- Provider (Optional)
- This lists the course providers that are entered in your system.
Once the various selections have been made, the Courses drop-down will populate with a list of courses that fit the selected criteria.
Show Curricula
For courses contained within a mapping curricula or certificate, first select the Show Curricula option. This will cause the Curricula filters to display. Select the curricula in question from the first dropdown, then select the specific course from the second.
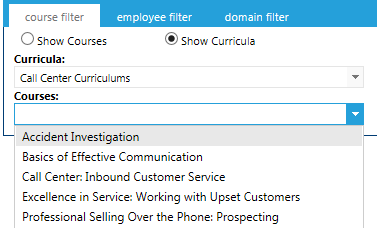
Note: For courses that have audiences both within and outside of a curricula, if you select the course from the Show Courses list you will see all users’ status in the course without curricula audience information. If you need to know who is part of the curricula audience, be sure to select the Show Curricula option.
Employee Filter Tab
If you are searching View by Course, this is an optional filter. If you do not make any selections, you will see the most recent enrollment for all users in the course audience.
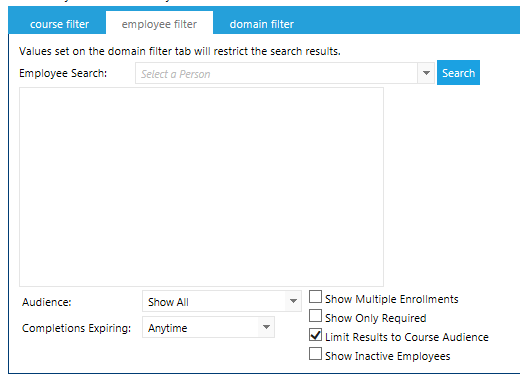
The Employee Search field allows you to narrow your results to one employee. Typically this is left blank when using View by Course option.
The Audience dropdown allows you to limit your results based on the following criteria:
- Show All
- This is the default. It shows the entire course audience (everyone who is allowed to take the course).
- Show Enrolled
- This is primarily a status for Instructor-led courses. It shows users who have enrolled in a class instance.
- Show Completed
- All users who have completed the selected course.
- Show Incomplete
- All users in the course audience who have not completed the course. This includes users who do not have the course on their plan, but they could take it.
- Show Not Enrolled
- This is primarily a status for Instructor-led courses. It shows users who have the course on their plan, but have not yet selected a class instance.
- Show Not Started
- Users who have the course on their plan, but have not yet started it.
- Show Waived
- Users who have a waive status.
- Show Exempt
- Users who have an exempt status.
- Show on Plan
- All users who have the course on their Development Plan. This status will include users who are Enrolled, Incomplete, Not Enrolled, and Not Started.
- Show On History
- All users who a completion. This status will include users who are Complete, Waived, and Exempt.
- Show Passed
- All users who have passed the course. (This status is not shown in all systems).
- Show Failed
- All users who failed the course. (This status is not shown in all systems).
There are several additional filters you can apply on top of the audience selection.
- Completions Expiring
- This dropdown allows you to limit your search results to just completions expiring in a selected amount of time. Each selection will also include any expired completions.
- Show Multiple Enrollments
- Select this checkbox to view every completion and enrollment for each user. When this box is left unchecked only the most recent enrollment for each user will be shown.
- Show only Required
- Select this checkbox to limit the results to only users who are in a required audience for the selected course.
- Limit Results to Course Audience
- By default this checkbox is selected, which limits the results to users who are part of the course audience through a course audience tab or curricula mapping. When this box is unchecked, you will see everyone allowed by your security, even users who are not part of the course audience.
- Show Inactive Employees
- Select this checkbox to view users who have an Inactive status.
Domain Filter Tab
Once the course has been selected, you may choose to narrow down the audience using the domain filter. This is an optional filter. If you do not make any selections, you will see the most recent enrollment for all users in the course audience.
You can use a single filter or combine them to further narrow down your results. If you use more than one filter, the filters combine with an “and.” In the example shown below, your results would only include Account Managers in the Sales department.
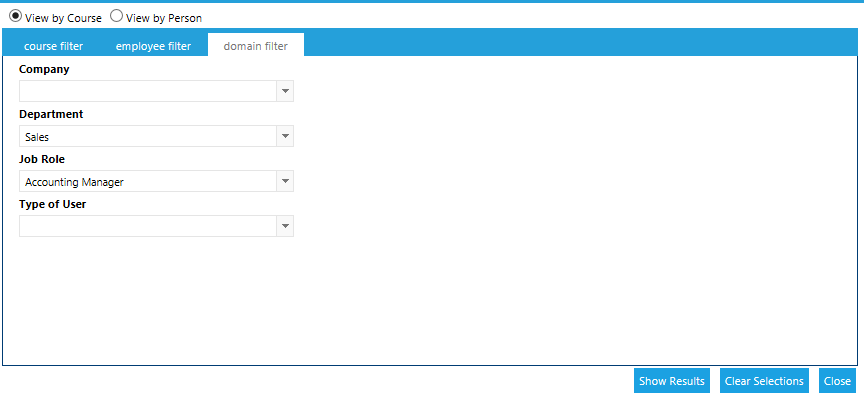
Show Results
Once you have selected your filters, click the Show Results button in the bottom right-hand corner to proceed to your results.
Clear Selections
The Filters and Options pop-up will retain your selections after you leave this screen to work in the Results grid. To ensure that you don’t have any forgotten selections affecting your new results, click the Clear Selections button each time that you need to select new criteria on the Filter and Options pop-up.
Example: On the View by Course option, you use the Domain filter to limit your results to just the Sales Dept. After you are done, you decide to switch to View by Person and need to select an employee in the Customer Service dept. If you don’t Clear your selections, your Sales Dept domain selection will limit your Employee Search to just employees in the Sales Dept.
Related
Manage Credit and Enrollment Screen
The Results Grid
Toolbar Options
Enroll a Group
Set Completion
Set Completion vs Enroll and Set Completion